|
Modifications
and Maintenance
Got
a modification or a maintenance idea?
Send me your information
and photos to be featured on this page. If you want your pictures returned
send an SASE for return
You may also e-mail me any information along with photos. richard@route6x6.com
Winch
plate
to fit MAXII and MAX 4 models for more information richard@route6x6.com
Left
stick modification
by one of our ROUTE6x6 Friends, this may help some people!
The
Thin Disguise
this idea from Ron House may help you getting from trail to
trail.
A rust free
tip from John Bushinski: "Here is a very simple and insignificant
trick to keep the rust off unpainted axles. Get some leather
shoelace and soak it in oil the tie around axle with two inches
of slack. As the machine drives the leather lace keeps the rust
away". Remember when you were a kid and did the same basic
trick to keep your axles of your bicycle clean and bright!
Global
Positioning System.
New 1998 Max II equipped with Omnistar GPS Laser Plane Surveying
and Field tile Mapping Equipment. A joint effort between RICHARD'S
RELICS
and LI'L ENGINE SALES AND SERVICE.
Want to
push snow with your MAX2? Here is a photo
of the mount setup. This same basic system would work on most
other ATV's.
Pete Lanc
has been busy. Here is a good idea of what he is doing! 
"I have
been designing a family of Multi-wheeled vehicles. I thought
that you might want to see them. They are based on a 'universal
Carriage-all terrain' (UNI-CAT for short). They all have the
same components, just more or less to suit. They are road legal,
trackable and amphibious. They have an integral trailer, and
auxiliary motor. The std vehicle is 8x6, but 4x2 on the open
road, 3.8 Metres long and 980kg. They have an integral remote
system. I have shown a few configurations, but these 'clip ons'
are only limited by your imagination. Power is either Petrol,
diesel, direct drive,electric or hydrostatic (dedicated or with
any combination of them as they are modular) I have also been
designing in my spare time a 6x6. it seats 2 in tanden, and
is powered by a mazda rotary of 112HP. It has an inflatable
wing and a rear mounted Propeller for air service (110Kph cruise)
and all up weighs about the same as a medium sized quad with
2 on board (274kg). Every thing stows away on board when being
used on the ground, but it is limited to 30KPH. I have some drawings
if
you want to have a look". UPDATED.
Photo
of the lower body
Looks neat,
We hope you go ahead with these projects! Contact Pete
Lanc.
He is looking for interested people for possible production.
Here is a chance to get in on the foundations of a new ATV concept.
Brian Hadt
has solved the night time driving problem! He states: I have
some pictures
of
my Argo Magnum specially outfitted for night riding. I have:
15 little clearance lights, 6 head lights, 4 dome lights, backup
lights, a strobe air horn, C.B. as you can tell I don't like
the dark". I bet it looks like a UFO comming through the
woods, neat!
Argos in
the UK - September 1999 by Richard Walsh: It's interesting to
take a look at the diversity of use that the ARGO is put to
here in the UK. You may be aware that the ARGO has been imported
since the early 1970's by Crayford Special Vehicles Ltd and
is the best selling all purpose, all-terrain amphibian in the
UK. In fact there's no other amphibious ATV on the market here
... yes no MAX !! However, competition for the ARGO is fierce
in the form of the massive numbers of conventional Quad ATVS
that have become commonplace in every farm in the country whether
they be hill farm or arable. There's also a considerable price
attraction to a Quad, virtually half the new price of an 8x8
Conquest. We don't have the open spaces and uninterupted access
to the countryside that many parts of the USA have, there's
many restrictions to off-road recreation in the UK and therefore
primary users of new ARGOS are in the sporting estate, farming
and industrial utility service sectors. Scotland offers the
most ardurous terrain for the ARGO user and practically every
sporting estate in the Highlands has at least one ARGO. During
the stalking season it's busy, throughout the shooting season
too, and during the rest of the year will be involved in estate
maintenance such as fencing and tree work. The most popular
ARGO model for this job used to be the ARGO 8x8 MAGNUM with
the 18hp Kohler engine. Usual specification would include a
full or half cab with windscreen, a winch would often be fitted
too. The photograph below shows a 1991 Magnum with 844 hours
on the hourmeter recently from a Scottish Estate. ARGOCAB.
Considering
the terrain encountered in many Highland Estates these ARGOS
really do last well. Those heather covered hills hide rugged
rocks and tree stumps, most ARGOS have the optional full length
underbody protection which assists with protecting the underside
of the vehicle. Interesting too to take a look at the tyres
fitted. There's not a lot of amphibious application here, so
the Goodyear Runamuks aren't an essential tyre fitment. Indeed
it's normal practice to fit a more "agressive" treaded tyre
on the front four wheels to assist with grip whilst climbing.
ARGOTYRE. The
ARGO above is an early 1988 MAGNUM model with superwinch X2
and "dirt dog" front tyres. The steel floor on this machine
was totally rotted through although the chassis rails were in
good condition. After a little basic refurbishment this machine
has been put back into work as a support vehicle on an off-road
go-kart track. It seems that most ARGOS are replaced by the
Sporting Estates after around six years, although sooner if
finances are good and hours are high. Early 8x8 CONQUESTS are
coming onto the second-hand market and holding their money well,
appearing at roughly half new price, but of course dependant
on hours, condition and extras fitted. Once the vehicles get
older they filter through to those interested in off-roading,
mainly as a kind of novelty vehicle and are often in a "tired"
mechanical state by this time. Some fall into enthusiasts hands
seemingly fascinated by the oddity of driving a vehicle without
pedals or steering wheel ! We'll take a look at some older spirol
pin machines next time.
A Max II with
a rollbar, convertable top and factory snow plow. Let it snow!
Gary Harper
found an old AMPHICAT. Have you ever seen one like this?
Photo 1 , Photo2.
Larry Doucette
is restoring an original Hydro JIGER.
Yes
Jiger had a hydrostatic machine in the 1960's!
ATTEX 450
TOMAHAWK sent in by Frank LaPalla. Note the clutch is installed
backwards! PHOTO
1
, PHOTO
2.
Mike Foate's
MaxII spray outfit: The max's 25 gallon weed sprayer is powered
via an auxilliary cigarette lighter(that has a dust cover).
The weed sprayer power cord plugs into the lighter outlet. I
also put a switch in that line to turn the pump on and off.
This switch really wasnt needed as the pump turns off when it
comes up to pressure when using the handgun on and off but I
needed a way to turn the BoomBusters off. For handiness I added
the switch to be used when the BoomBusters are being used. That
way rather than turning the valves on and off I just flip the
switch on the cord. We investigated the possible use of the
Max for this purpose because we needed a reliable tool that
could get us around this rough country much of which we can
not get to in a pickup, (as is evidence by our neighbors spraying
by helicoptor much of their ranch) and to save us wear and tear
on the pickups. I also needed a tool to get me around the acreage
that I flood irrigate in the summer and to get me to fences
that need mending. We need to cross Clear Creek to get to much
of the ranch and since it is a water crossing the Max will work.
Pickups used in creek crossings=no more wheel bearings! PHOTO
1
, PHOTO
2.
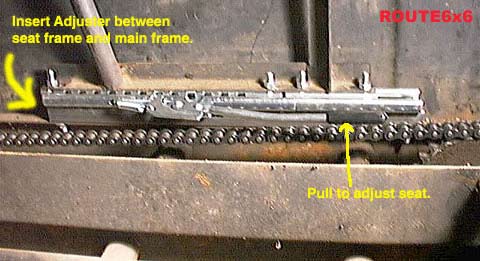
Jim Washburne
has the answer to the legroom problem in a MAX 4!!!!!!!!
He has designed a nice seat adjuster. Jim states: "...
here is a
PHOTO of
how I mounted my seat adjuster in my max 4. I saw an ad for
seat adjusters in a Summit car parts catalog for $24.99, but
I have not seen them in person. My seat adjusters came from
a Cobra kit car. In general:
1. mark the front and back of the seat frame where it hits the
main frame
2. remove the seat frame
3. mount the bottom adjuster to the main frame (might require
drilling if holes don't line up)
4. mount top adjuster to the bottom of the seat frame
5. slide the seat in from the front
I did however have a few difficulties/challenges:
1. the seat adjusters I used were too short, so I welded 2 together
on each side (note 4 bolts in photo)
2. a cable can be run between the two sides (thus tying the
adjuster handles together) so only one hand is required to move
the seat
3. THE FLOOR PANEL HAS TO BE MODIFIED FOR SEAT MOVEMENT!
4. I welded the seat belt rail to the seat frame instead of
mounting it to the body
My hat goes off to Jim for fixing this age old problem, I bet
we will see others do this now!
Thanks, Jim
John
Leurck has a time saving tip: "I had to fabricate some
new front axles (grade 4140 steel 1 1/4" round stock) for my
1982 ARGO 8x8, since I run Goodyear Rawhide III on the front
I designed them to inset the tires 1" closer to the body, in
hopes of reducing bent axle problems. But the real tip is when
I was aligning sprockets on this double roller machine, I found
that using a laser pointer pen between the double sprocket and
shinning the dot to the next sprocket sure did "pinpoint" alignment!"
Thanks John!
Henry Pitts
good work! "Attached are several photos showing a roll
cage/top I made for my MAX II. The frame is easily made
of pipe and bolts on the the flange on each side of the tub.
The top is made of material bought at the local fabric store
and sewn on my wifes sewing machine. It is all fastened with
snap fasteners to the frame and the machine. I have sides as
well but no doors yet. It really helps in the winter. The total
cost was about $150.00 for all the material. Also I have included
a photo of an outboard bracket
I made. It is a piece of 2x10 lag screwed up through the flange
and braced with rods through the back of the body. I used fender
washers to back up the braces. I have used both and electric
motor and a 21/2 hp gas motor. It works well and only cost about
$5 for the bolts and board. The third photo is my trailer
that I haul the MAX on. It was built by a local farm equipment/welding
shop for about $400. It tows great and loads easily".
Are you
tires spinning on the wheels? David Berger has one soultion:
"Use self taping screws long enough to only go 1/2 way
through the tire, about 8 per side, use tubes to keep 2 or 3
psi, this works well enough to do wheelies with" PHOTO
1, PHOTO 2 Thanks
David!
Here is
an idea from Kenneth Gerdes Jr. to improve water performance:
"I have a modification idea for ATV's. If you drive in
open water alot it should come in handy, without the hassle
or cost of outbourd motor. Simply mount four paddles to the
lugs that hold rims, excluding the middle ones. This can be
done by mounting a piece of 4"x5" quarter inch steel to a 8"x1"
piece of flat bar. The end result is like a small flag. With
the paddle portion able to fold in and out of the rim. They
stay out of the way when on land and fold out just before entering
the water. It works great on my Hustler! You wont win any boat
races but it will increase your speed on the open water. It
also enables you to turn much more efficiently. Kenneth Gerdes,
Jr.
Anthony
Garcea has been busy, check out his custom ARGO. It is a Real
Snow Mover! Interior,
Plow mount, Plow,
Defroster, Wiper
and Anthony himself! Looks
nice keep up the good work.
Mel Torrie
Computerized Triton Predators. "The first
photo shows two vehicles spraying a field together (I
can get you an mpeg vid clip if interested). These are controlled
either by joystick or autonomous remote computer using a GUI
and map information. The second
picture (explorer) shows an implementation where the
Predator takes a small robot out to a hazardous materials site
and lowers to the ground for site characterization. The third
picture shows the vehicle outfitted with a soil sampler."
Jim J: "Here
are some pictures of the
rollcage I made with winch bumper .it is made of 1'' and half
square tubeing with cut corners instead of bends"
Ken Goldbeck
wished to share a helpful hint: I have a six wheel scrambler
and have replaced all the 12 tooth sprockets. I got them from
a local bearing and drive shop. I did have to have a machine
shop open up the hole it was only about 1/2 inch to begin with.
Be carefull when you have them welded on I know on the clutch
disk the welds need to be small so the chain doesn't ride on
the weld.
Tim Wafer's
Mods to his MAX IV: Max IV Modifications Here are some of
the modifications I made to my Max IV. I replaced the front
seat with a single bucket suspension SEAT.
I mounted the BRACKETS
to the inner rails as shown in the pictures and drilled 4 holes
through the FLOOR. I made
the seat quick detachable by removing 4 hitch pin clips. This
allows the front seat and floorboards to be removed with no
tools in a matter of seconds. The seat has worked out very well.
It allows much more legroom for passengers in the rear seat
by allowing them to stretch out on either side. You can still
shift your weight when need be by sitting on the edge of the
seat or I even added boat type cushions to the fenderwells on
each side. The seat is also adjustable back and forth. It was
purchased from Northern Hydraulics. I installed UNDER
SEAT STORAGE in the rear by hinging the seat cushion in
a manner that provides a friction fit against the seat back.
It tucks under the back snugly enough to eliminate the need
for any latch. The box itself is the bottom of a plastic toolbox
I purchased at True Value Hardware that happen to fit perfectly
in the frame. I just screwed it in place. That whole job took
about a half-hour to install. I made the REAR
RACK by welding up a frame and having it slip over four
studs that stick up from extensions I put on the roll bar frame.
The rack is held on the studs by rubber bungee cords. That way
the frame can flex somewhat if I hit a tree with it instead
of bending. The wooden slats were sawn from treated 2x6 s and
then planed and beveled. The FRONT
BUM{ER and winch mount was made from 1-1/4Ó iron pipe, which
was heated and bent to match the contour of the body. I bolted
it to extensions I again added to the roll bar frame. I also
added a couple tow hooks to it. It seems quite rugged and provides
a better mount for the winch than just the body alone in my
opinion. Tim
Brad Dunn's
Mods to his MAX II PHOTO
of Max with Trolling Motor for next time. Some of you might
be interested in the screening I put over the vents. This really
helps keep out the big stuff. I also took a small rubber car
floor mat, cut two slits in it for the steering sticks to cover
those large holes in the floor that let so much stuff in.
Also he has installed a Bilge Pump inside the tight fitting
MAX II Check out where he put it! PHOTO
Mike Kirovac
build some tracks for hi s MAX IV, his words: "The tracks
i got from a snowmobile dealer. They are used and they throw
them away so Igot thforem free. I used 4 snowmobile tracks.
I joined two tracks together for each side with flexco belt
splicers for $8 each. Then cut to length 14' 8". I made the
bearing rails from 1 1/4 inch aircraft aluminum rod and bolted
to the bearing cages. I bought 6 3" wheel extenders from Richard.
I made the tire guides from 3/4 inch conduit. I cut them in
11" lengths and bent them in the form of a triangle. I bolted
them to the tracks using 1/4 inch bolts. PHOTO
set.
Richard
Standfer sends in this cleaning tip: For those of us who don't
have access to a steam cleaner, I found a product called RIGHT
STUFF. It really does good job. I purchased mine at a LOWES
LUMBER.
Larry Noworyta Send us these really neat plan to build a useable
AATV Support Platfom. The details plans
are for the common MAX II but one could easly change the sizes
for any AATV. This lift allows all six wheels to be off the
ground an dis a great way to clean and lube the chains with
the machine in gear and at idle. If the wheels are removed the
bearings will take grease much better than if it was at a standstill.
PHOTO, and DETAILED
PLANS. If you want to contact Larry he is listed in the
OWNERS SECTION of ROUTE6x6 under state of OR. (Editors note:
Just for insurance make sure to strap the AATV down) Thanks
Larry.
Hi Richard: would you please put tis on your how to section
this top was made by a friend of mine .
I think it adds some class to my home made roll cage allready
on your web site. Jim PHOTO
 Here
are a few tried and true tips for rusty 6x6 disassembly: Here
are a few tried and true tips for rusty 6x6 disassembly:
1. Before trying to remove set screws from bearing lock collars,
spray with favorite penetrating oil (PB Blaster).
2. Clean out head of set screw with pick and compressed air.
Spray again.
3. Use a small flat bottom punch that just fits into the head
of the set screw and smack it a few times with a hammer. This
will loosen the set screw in the threads and hopefully the Allen
wrench and the set screw won't strip.Removing difficult balloon
tires.
1. Spray with favorite penetrating oil. Remove nuts holding
the wheel to the hub.
2. Use 3/4" brass rod as a punch to hammer the hub away
from the wheel. This method works best if the machine is resting
on the tires and not on a jack. This works so much easier than
beating the tire off with a 2x4 !!!Also when removing axles,
the axle slides out of the inner bearing easier than the outer.
So get everything as loose as it can get and then remove the
bolts holding the outer bearing to the frame. Remove the outer
bearing with the axle. Sometimes it helps to spray the axle
and bearing and then smack it into the body a little bit before
trying to pull it out of the body. I have had success by reinstalling
the through bolt in the sprocket and using a pry bar to pry
to sprocket and axle assembly out of the inner bearing. I also
use pipe wrenches on the sprocket tube and axle to get them
broke loose while spraying Blaster on them.I know you have done
this many more times than I have, but these methods work for
me. Thanks .Lance Dolfi |

