 |
|
|
Step - by - Step How to Axle and Bearing replacement This is another addition to our new how to series, we will ba adding more every week, so check back often. You may also e-mail suggestions for future how - to's to. richard@route6x6.com Axle and bearing replacement is a common maintenance replacement
item to all AATV's. Argo, Max, Hustler and others all used simular systems
and concepts, some have the inner bearing in a sheet metal flange, as
shown below on the outer bearing, others ride on a single brass bushing
on inside. Some axles are splinned but the replacement concept is the
same. We at ROUTE6x6 and RICHARD"S RELICS stock and supply all bearings,
axles, flanges, brakes, sprockets for most machines at discount prices
Click to go to
CHASSIS PARTS PAGE |
|
Axle
and Bearing replacement |
|
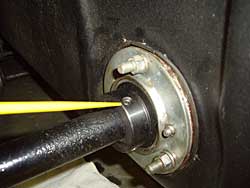 |
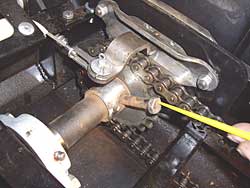
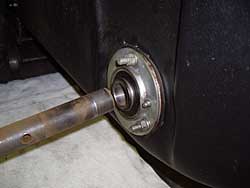
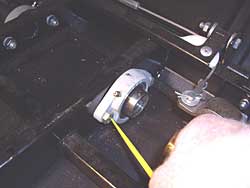
Always disconnect negetive
battey cable before servicing your machine. First remove tire assembly and jack up machine, clean bearing flange area as shown in photo. Yellow pointer is showing the set screw hold in the ecentric locking collar bearing. Note there are two holes in this collar, one with set screw, other one is drilled but untaped. Remove set screw ( yellow pointer) Note: There may be another set screw under the top one. Remove both with the correct size allen key tool. Click on PHOTOS to see larger view |
 |
|
 |
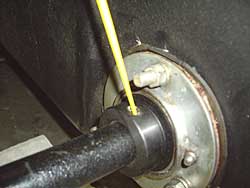
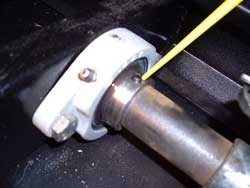
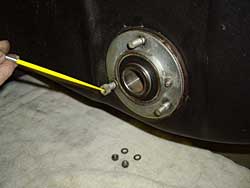
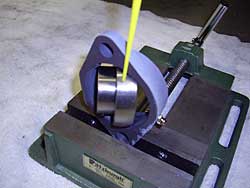
After removing set screw (s) Turn bearing untill you see the drilled untaped hole, shown by yellow pointer. Take a punch and a hammer, tap (hard) on punch, held in drilled hole, first try clockwise (CW) if the collar does not come loose tap counter clockwise (CCW) untill collar spins free of bearing inner race. |
 |
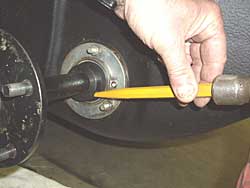
Locking
collar is now free and spins on axle. Click on PHOTOS to see larger view |
 |
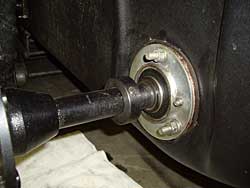
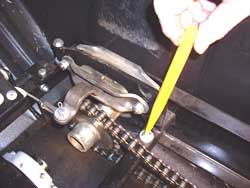
Working insdie the machine remove the through bolt holding sprocket to the axle, see yellow pointer. Sprocket should slide back and forth on axle with ease. You do not have to remove chain or disconnect brakes to do this job. Now is a good time to check condition of sprockets, brakes and chain. Note: Some machines do not use a bolt, some use a coil pin driven in, instead of a bolt, others use a set screw, to locate sprocket to axle, this is usually on splinned axle machine. |
 |
This machine has a inner bearing in a cast iron flange, Remove set screw as shown by the yellow pointer.
What you are doing is: Releasing the inner race of the bearing from the axle, this is just a set screw bearing, some machines will have a ecentric locking bearing here too, if so remove collar as described in above steps. |
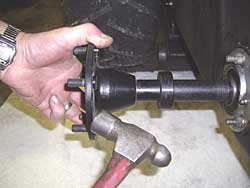 |
Working back outside machine. Tap out axle with a hammer Note: Sounds easy, but rust and damage can keep axle from coming out, apply lots of PB Blaster and let the axles soak, where they go through bearings and sprockets. |
 |
This view is inside machine, shows axles coming out of inner bearing as one taps on axle to slide it out. Note: If your machine is a early MAX II then you will not have this inner bearing, your axle is machined on inside and spins on a brass bushing instead. This old system is really pretty good, with th brass bushing outlasting the outer bearings many times. we ar tRICHARD'S RELICS stock these brass bushings too. |
 |
Click on PHOTOS to see larger view |
 |
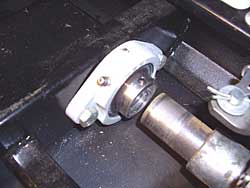
Note: Some machines will have four bolts Note: See how bearing is installed with inner race lip outwards, this is what the locking collar "holds" on to. |
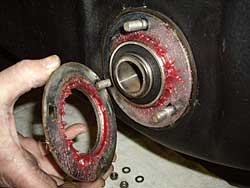 |
Note: The red grease. Be sure to use some waterproof grease on the flanges upon ressembly to prevent water from leaking though the flanges. |
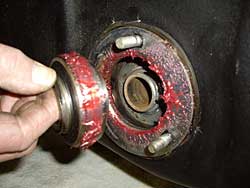 |
Outer bearing can now be removed and replaced We at ROUTE6x6 and RICAHRDS'S RELICS feel due to low cost of these bearings and high degree of effort to "get at them". We always replace old bearings with new ones. Click here to go to the ATV Chassis parts page |
 |
Back on inside of machine. To remove and replace inner bearing, remove the bolts as shown by yellow pointer |
 |
Check iron housing for cracks as this occurs often. |
 |
If your machine is equipped with disc brakes now is a good time to check or clean them. attachment points as shown by yellow pointer. |
| Reassembly |
|
|
Reassembly
is a direct reverse of above steps: Obviously: Rusty axles should be sanded clean before reassembly |
|
|
|
Note: Make sure you do not tap on hole that has threads for the set screw, use other hole. |
|
Note set screw is only used to keep locking from releasing from inner bearing, not to hold axle to bearing. |
If you have any
questions, you welcome to contact us at richard@route6x6.com Replacement parts
available at RICHARD'S RELICS
ATV Chassis parts page |
|
| Home | About This Site | New Toys | Information Bank | What's New | Blast From The Past | Museum | Tips | Photo Gallery | How To | FAQ'S | Memory Lane | Classifieds | Discussion Boards | Cartoon | Events | Shoppe | Parts for ATV's | Owner Registry | Links Webmaster: For questions or comments
|
|
